Setting Up UF-LOCO: A Step-by-Step Guide
Published by Juan David Ramirez on 14th Apr 2025

Hey there! I'm Juan David, Flytec's Tech Support Lead. If you’ve ever looked at a UF-LOCO and thought, “What exactly does this little device do and how do I set it up?”, you’re in the right place. Today, I’m walking you through the complete setup, from unboxing to configuration. Whether you're an installer working on a rural project or a tech-savvy homeowner ready to tap into the fiber revolution, this guide is designed for you.
Let’s get your UF-LOCO up and running with confidence.
What Is the UF-LOCO Used For?
UF-LOCO is a GPON (Gigabit Passive Optical Network) customer-premises equipment (CPE) device. In simple terms, it’s the bridge between your fiber optic internet line and your local network. It takes that super-fast fiber connection and turns it into something your devices — like PCs, IP phones, and smart TVs can actually use.
Common Real-Life Applications:
- Residential Fiber Installations
Homeowners love the UF-LOCO because it’s compact, reliable, and delivers high-speed internet without clutter. - Small Businesses
In small offices, it’s perfect for saving space while offering fast and stable connections. Pair it with a UniFi airCube (ACB-AC) for seamless WiFi. - Multi-tenant Buildings
ISPs often use it in apartment buildings to give each unit dedicated fiber service in an efficient and cost-effective way. - Rural Fiber Projects
With a 20 km fiber reach, the UF-LOCO is a favorite in rural deployments where long-distance connections matter.
The UF-LOCO is designed to keep things simple, for both users and installers. While it does not have built-in WiFi, it works seamlessly with other UniFi networking devices to provide comprehensive connectivity solutions.
What You'll Find in the Box
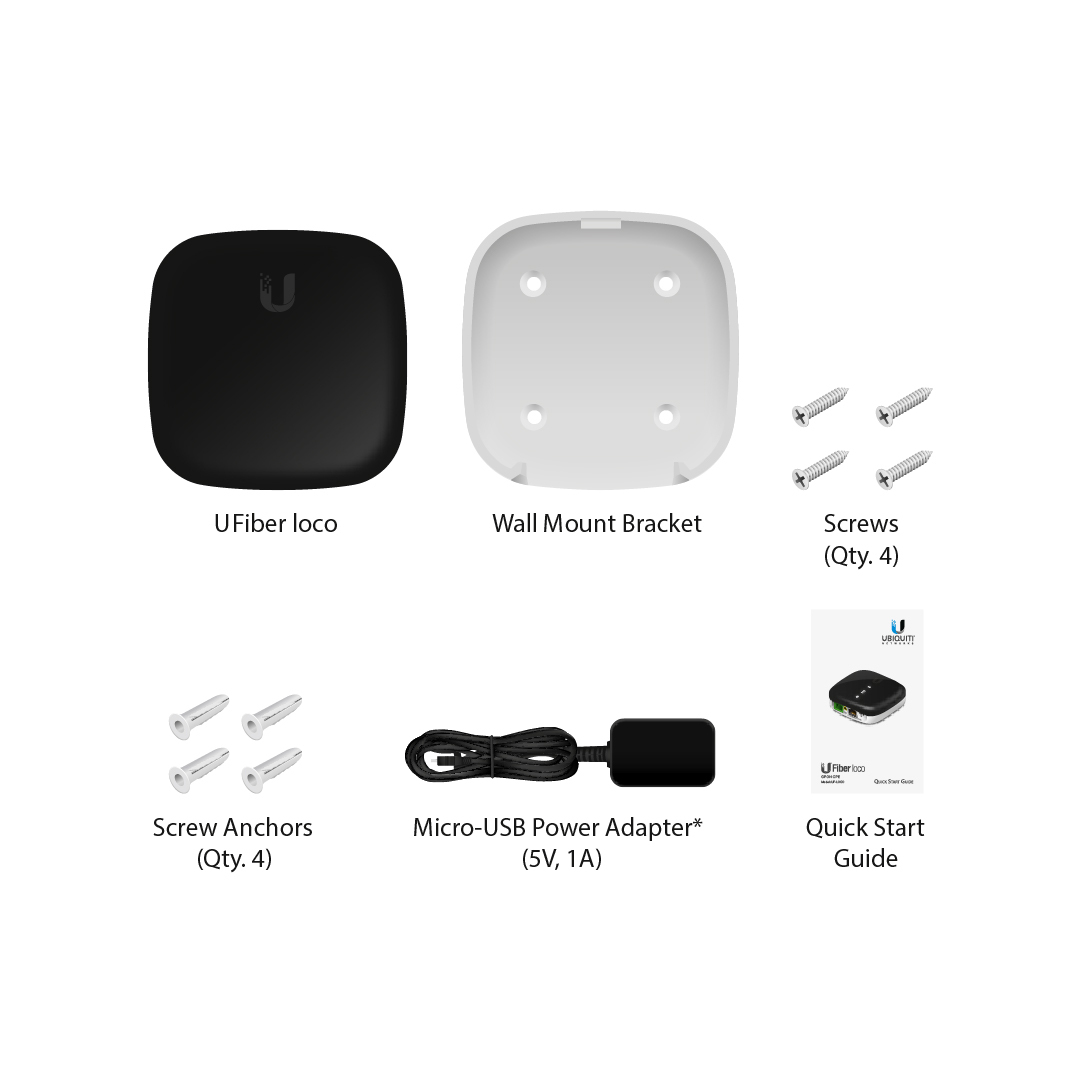
- UF-LOCO GPON CPE
- Wall Mount Bracket
- 4x Screws & 4x Screw Anchors
- Micro-USB Power Adapter (included in single pack only)
- Quick Start Guide
System Requirements
- PC with Windows, macOS, or Linux
- Google Chrome browser (recommended)
- Ethernet cable (CAT5 or higher)
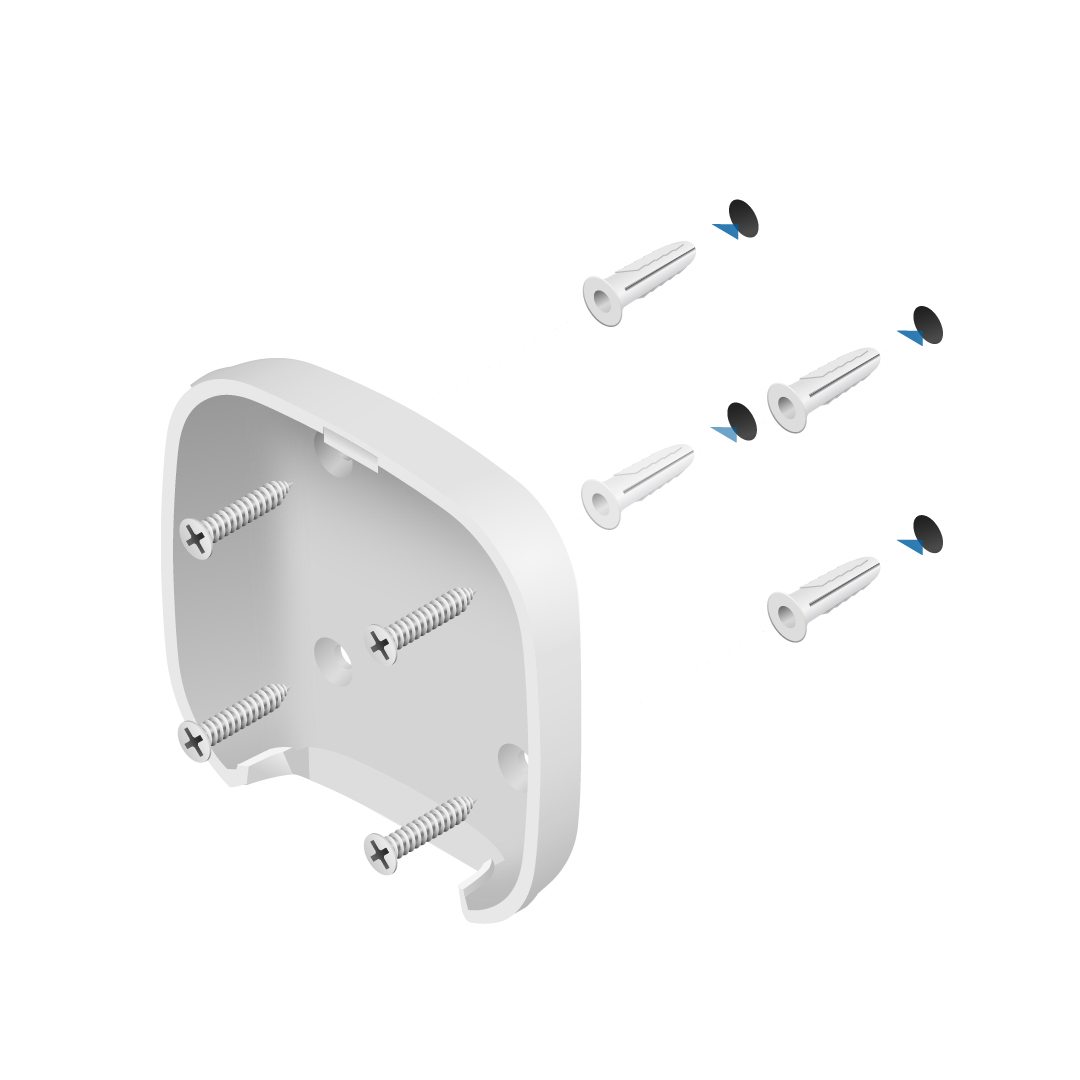
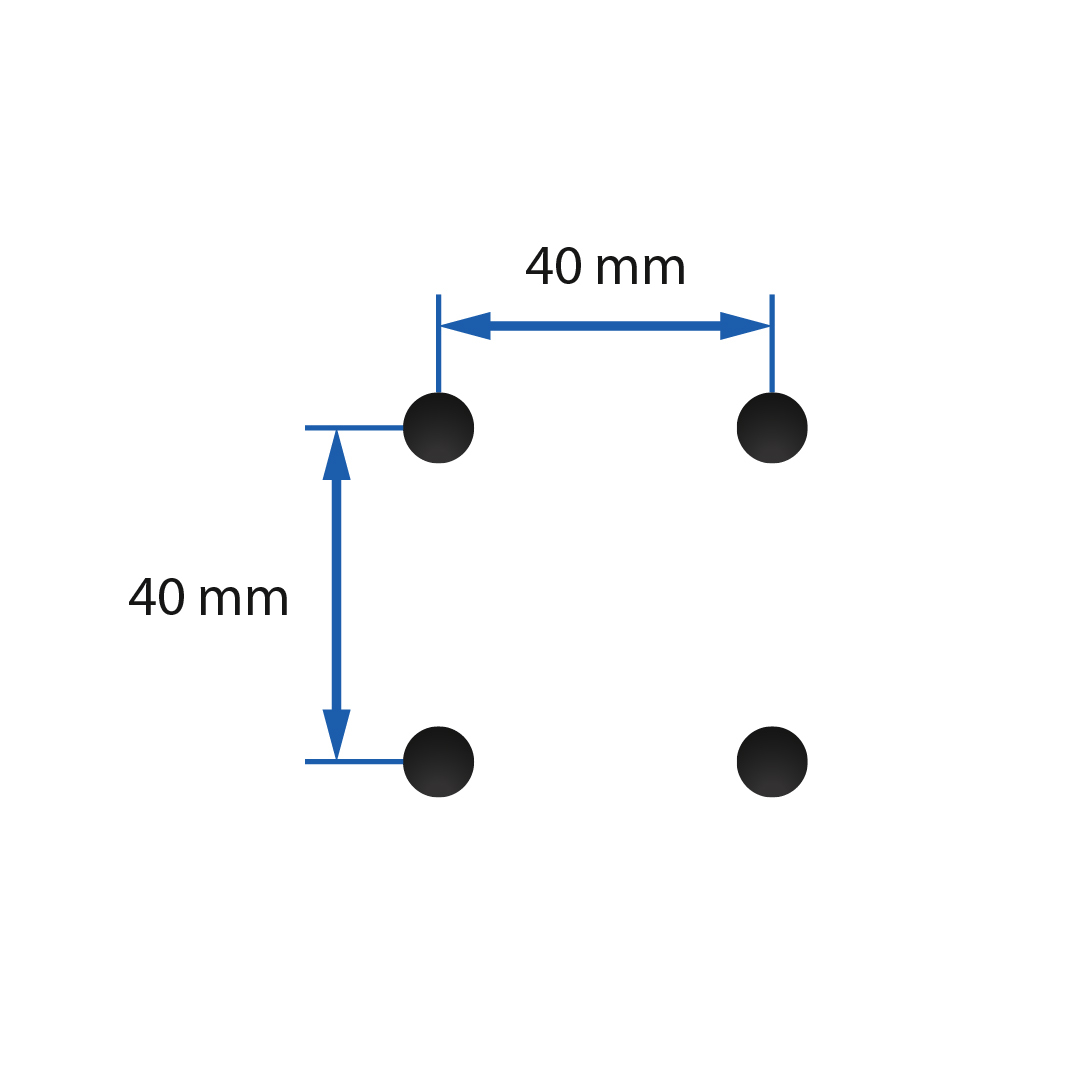
Mounting the UF-LOCO (Optional)
You can either place it on a desktop or mount it on a wall.
Wall Mount Steps:
- Use the bracket as a template and drill 4 holes (40mm spacing).
- Insert screw anchors and attach bracket with screws.
- Mount the UF-LOCO by snapping it into the bracket.
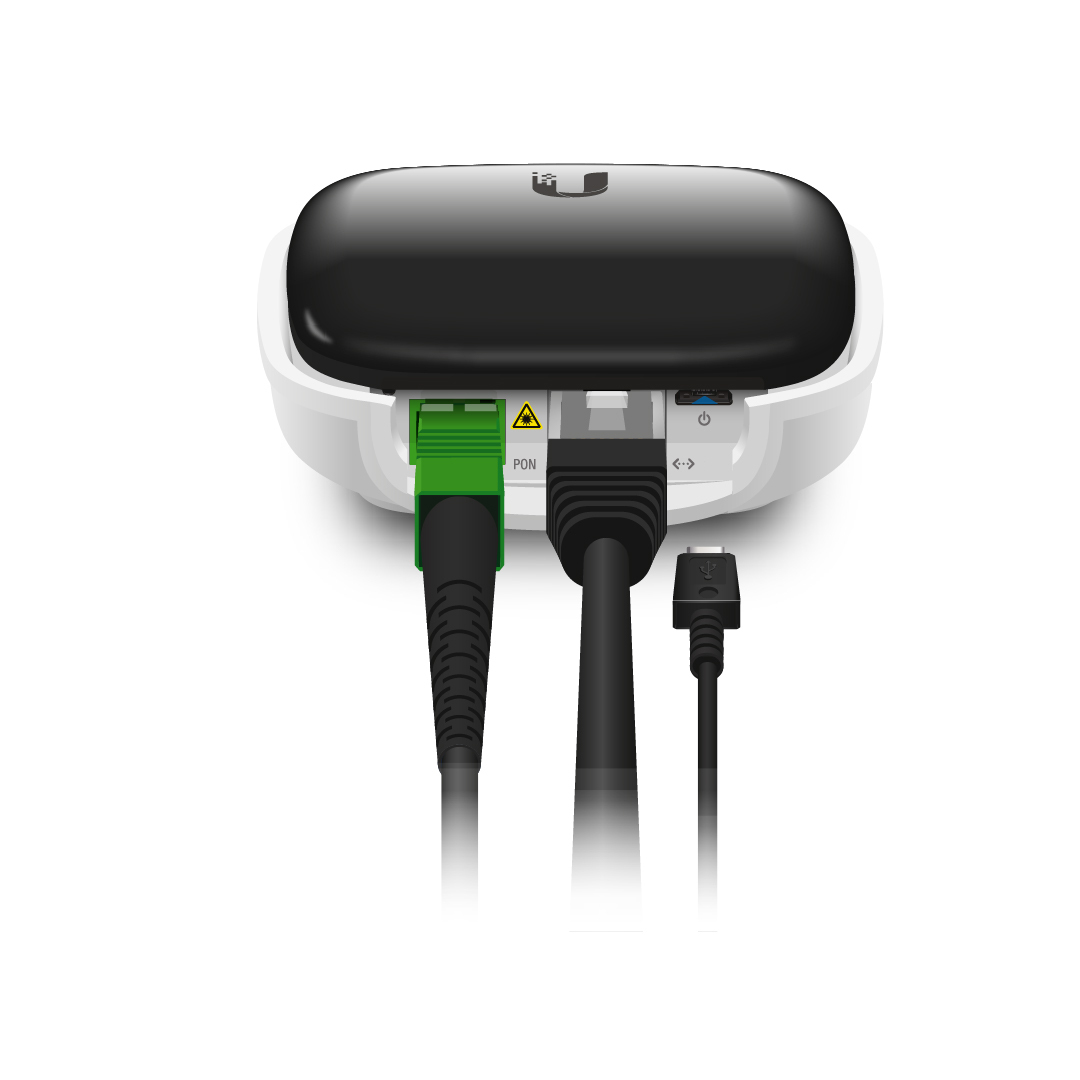
Step 1: Connecting the Fiber
- Connect the SC/APC fiber cable to the PON port.
- Ensure the fiber source is clean and coming from an active GPON network.
Step 2: Connecting the LAN
- Plug an Ethernet cable into the RJ45 LAN port.
- Connect the other end to your router, switch, or directly to a computer.
Step 3: Powering Up the UF-LOCO
You have two main power options:
Option A: Micro-USB Power Adapter
- Plug in the adapter to a wall outlet and connect it to the device.
Option B: 24V Passive PoE
- Connect the Ethernet cable to a PoE-enabled port on a switch or injector.
Pro Tip: If you're using an airCube, it can power the UF-LOCO via PoE and provide WiFi at the same time.
Step 4: Accessing the Web Interface
- Connect your PC to the UF-LOCO's LAN port.
- Assign a static IP on your host system in the 192.168.1.x range.
- Go to http://192.168.1.1 on your web browser.
- Login with username: ubnt and password: ubnt.
Step 5: Configure OLT Compatibility
- Navigate to Settings > System
- Choose from one of the 4 OLT Profiles (default is Ubiquiti)
- Save and reboot
Optional: Set Up with the UISP Mobile App
- Download the UISP app (iOS/Android)
- Scan for devices
- Monitor and manage your UF-LOCO remotely
LED Indicator Quick Reference
- Signal LEDs: Show fiber strength from red (bad) to 3x white (excellent)
- Ethernet LED: Solid white = link up, blinking = activity
Power LED: White = device powered on
Troubleshooting Tips
- No signal? Check connectors, clean fiber tips, or test with another OLT port.
- Signal too strong? Use a 5dB or 10dB optical attenuator.
- No authority? Ensure OLT password and settings are correct.
Final Thoughts
The UF-LOCO may be small, but it packs a punch, perfect for anyone looking to simplify fiber access without sacrificing performance. Whether you're setting up just one unit or deploying a hundred, the UF-LOCO stands out for its quick installation, user-friendly management, and budget-friendly approach.
Need help choosing the right UF-LOCO or setting it up? At Flytec, we’re here to support you with expert guidance and personalized assistance.
Frequently Asked Questions (FAQ)
- Q: Does the UF-LOCO work with non-Ubiquiti OLTs?
A: Yes. It supports multiple OLT profiles for compatibility with other brands. You can configure this in the web interface. - Q: Does it have built-in WiFi?
A: No, the UF-LOCO does not have built-in WiFi. However, you can pair it with a UniFi airCube (ACB-AC) to add wireless connectivity and extend your network coverage. - Q: Can I power it without PoE?
A: Yes. The UF-LOCO also supports power via Micro-USB. - Q: Is the UISP app required?
A: Not required, but highly recommended. It makes monitoring and remote management easier. - Q: What’s the max distance it supports from the OLT?
A: Up to 20 km with standard fiber deployments.
Q: Can I install it myself at home?
A: If your ISP supports fiber to the home (FTTH) and provides GPON service, yes! Just make sure to follow proper installation and safety steps.
